| GRATEFUL DEAD | DIVERSIONS | OUTDOORS | ALTERNATIVE | MISCELLANY | INTERNET | INNOVATIONS |

|
Sunday, July 26, 2026 |
|
|
SEARCH THE WEB! |
|
|
INFORMATION |
|
|
|
|
| Visual Design | |
Intro Part 1 Part 2 Part 3 Part 4 Part 5
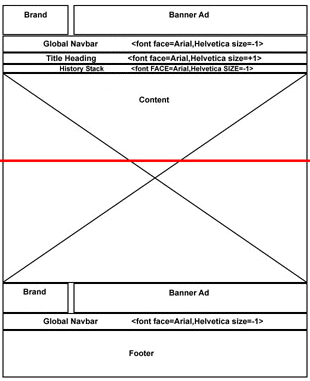
By now you know a number of things about your site: why you are building it, who the audience is, what will be on the site (i.e., the content), and how the whole thing is structured. You are now ready to work on the visual design, which is often the most satisfying aspect of site design. One of its main purposes is to provide users with a sense of place. They need to know where they are on the site, where they have been, and how to get to where they want to be. A good site structure combined with an effective visual design enables users to construct a mental map of the site. The goal of this lesson is to take the site's structure and map it onto the visual design. A number of tools are useful in creating the design. The first step is to make layout grids that define the structure and organization of the site as it will show up on the page level. Then design sketches will establish a general look and feel. Layout grids and design sketches together lead to page mock-ups, which in turn lead to the construction of Web-based prototypes. At this point, you'll need the help of graphic designers, art directors, and creative directors, as well as your production crew. Layout grids are templates that describe Web pages. Content - the focus of every page - requires prominent placement. You'll need to block out space for global and local navigation and integrate other aspects of the site that may not be part of the site structure. The company's brand must be present on each page. Advertising and sponsorship deals should be incorporated into the design. Here is an example of a layout grid:
To get started, take the site structure listing and make a list of all the possible page types. Individual pages within the site should be very similar in form across all the major sections. Review the content inventory, then try coming up with two or three generic page types. You'll start by designing these and then use them as the basis for all the other page types. To begin, break out your sketch pad or favorite graphics program. Create a rectangle representing the page, and block out the elements of your design. Since content is the most important element, start with that - even though it's a little tricky, since you won't yet know what else will be on the page. Several other elements must be considered: branding, advertising and sponsorship, navigation, page titles, header graphics, and footers, which include copyrights. Branding plays a prominent role on every page because it informs users that they are still on the site. A common place for the branding is in a page's upper left-hand corner. Advertising and sponsorship can be integrated in a number of ways. Perhaps you have a full-sized ad banner (typically 468 by 60 pixels) on every page. Do you put it at the top? Do you put it under the title of each page? How do you integrate sponsorship? Is sponsorship integrated into the graphics headers on each page? Is there a small sponsorship logo at the bottom of each page? These are all questions you need to answer. Finally, navigation also has to play a prominent role. Global navigation must be consistent across every page of the site. Local navigation systems can change, depending on the content, but try to be as consistent as possible. This is an iterative process. You will need to revise the layout grids several times. You will probably want to do two or three different styles for the layout, if you have time. Design Sketches and Page Mock-ups Design sketches are used to establish the look and feel of the site. They can be integrated with the metaphor or site structure rationale, but this isn't always necessary. Often, they are done concurrently with the rest of the information-architecture process, so you may already have the design sketches worked out and approved by the client. The sketches don't necessarily need to represent structure or organization. However, the graphic designers do need to know the size of the graphics files, as well as any technical constraints. The next step is to create page mock-ups, which represent the actual site, by integrating the design sketches with the layout grids. These should be as close to the actual pages as possible. Use your favorite graphics program to break up your sketches. Try cutting and pasting the pieces over their respective parts of the layout grids. Another option is to build the page mock-ups in HTML, using the pieces of the design sketches as the graphics. The page mock-ups are the basis for a Web-based prototype or, if your site is small enough, the basis for building the actual site. Page mock-ups need to be approved by the client, although it may be sufficient to have approval on the site structure and design sketches in order for you to move forward with the prototypes. You have now completed the steps in shaping the information architecture for your site! You have all the materials you need to construct a prototype, and everything else should fall into place. Before you dive into prototyping, add one last entry to your design document. Design
Document: Visual Design Intro Part 1 Part 2 Part 3 Part 4 |
|